Hollywood-level chroma key technology is now accessible to everyone. We’re cutting through the noise: professional video production no longer requires massive budgets or studio space. The tools for broadcast-quality results are within reach.
This guide delivers actionable strategies backed by industry practices. We’ll show you exactly how experts achieve seamless composites without wasting time on trial and error. Every technique is designed for measurable results.
You’ll master the complete workflow from setup to post-production. We focus on eliminating common mistakes like color spill and inconsistent lighting. Our methods deliver polished edges that compete with high-budget productions.
The ROI on proper chroma key methods is immediate. You’ll replace expensive location shoots with controlled, repeatable studio setups. This approach maintains professional standards while expanding creative capabilities exponentially.
Key Takeaways
- Chroma key technology is now affordable and accessible for various video projects
- Professional results require understanding proper setup and lighting techniques
- Avoid common mistakes like color spill and uneven lighting from the start
- Mastering this skill replaces expensive location shoots with studio efficiency
- The complete workflow spans from initial setup through final post-production
- These methods deliver broadcast-quality output that engages audiences effectively
- Proper technique implementation provides immediate return on investment
Understanding Green Screen Essentials
The core principle of a green screen is deceptively simple: remove one color to reveal another. This technique, properly called chroma key, layers different video streams based on color hues. The process converts a specific color range into transparency.
The Basics of Green Screen Technology
We shoot a subject against a solid-color backdrop. Editing software then digitally removes that specific color. This leaves the subject isolated for placement on any new background.
Why green? It sits furthest from human skin tones on the light spectrum. This separation is critical for a clean extraction. The industry-standard shade is a precise bright green (hex code #00ff00).
Using this exact color ensures consistency across cameras and software. Green also requires significantly less light than blue alternatives. This reduces your lighting budget and setup complexity from the start.
Historical Evolution from Early Techniques to Modern CGI
The concept isn’t new. Filmmaker Georges Méliès demonstrated creative compositing in 1898. He used multiple film exposures to create magical effects, a rudimentary form of what we use today.
This evolution from practical tricks to digital power proves the technique’s fundamental value. Modern applications are vast, from daily weather reports to blockbuster movie effects. Understanding this foundation is key to mastering the VFX process for any project scale.
The principle remains constant: isolate the subject by manipulating color. Mastering this allows for incredible creative freedom in your final video composition.
Benefits of Using a Green Screen in Video Production
Budget-conscious producers now leverage chroma key workflows to achieve studio-quality results without studio-sized expenses. This approach transforms the economics of content creation.

We see immediate ROI through eliminated location costs and streamlined production schedules. The technology delivers flexibility that physical sets cannot match.
Cost-Effective Set Enhancement and Flexibility
Virtual backgrounds replace expensive location shoots and elaborate physical constructions. This capital can be redirected toward superior equipment or talent.
The strategic advantage lies in shooting once but repurposing footage endlessly. Seasonal updates, regional variations, and A/B testing become simple background swaps.
Weather dependencies and scheduling conflicts disappear entirely. Your production timeline operates on your terms, not external constraints.
Key benefits include:
- 60-80% reduction in set construction budgets
- Total control over environmental conditions
- Scalability from solo creators to enterprise teams
- Access to logistically impossible locations
- Dynamic visual storytelling capabilities
This approach democratizes production value, allowing small teams to compete visually with well-funded competitors. The flexibility becomes your competitive edge.
Expert Green Screen Tips for a Seamless Setup
We prioritize physical setup because it determines 80% of your final composite quality. Proper preparation eliminates post-production headaches before filming begins.

Selecting the Right Material and Color
Material choice directly impacts editing efficiency. Invest in professional muslin or polyester backdrops rather than budget kits. These materials absorb light evenly and resist wrinkling.
For permanent installations, cyclorama setups represent the gold standard. They enable full-body shots from any angle without visible seams. Use industry-standard chroma key green (#00ff00) for consistent results across platforms.
Maintaining an Even Surface and Minimizing Wrinkles
Surface irregularities create shadows that confuse keying software. Even minor wrinkles register as different color values. This forces your editing tools to work harder.
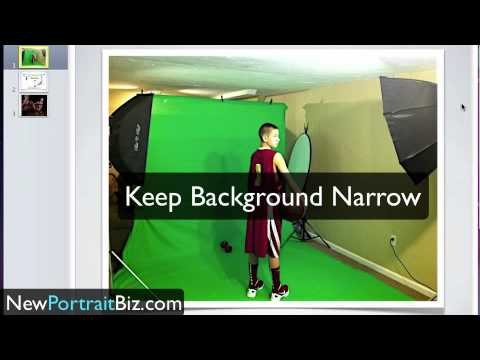
Make sure your backdrop extends 2-3 feet beyond frame edges. This safety margin prevents accidental visibility during camera movements. Smooth walls with proper paint often outperform wrinkled fabrics.
Distance and Positioning to Prevent Color Spill
Keep 6-10 feet between your subject and the background. This minimum distance prevents green light reflection onto your talent. Color spill creates correction nightmares in editing.
Use floor markers for consistent subject positioning. This discipline ensures repeatable results across multiple takes. Proper spacing also helps mimic realistic background lighting effects.
Lighting Techniques for Flawless Chroma Keying
Lighting is the decisive factor that separates amateur composites from professional-grade chroma key results. We treat illumination as a non-negotiable technical requirement, not a creative afterthought. Proper setup eliminates 90% of post-production challenges before you even press record.
Our approach mandates two completely independent lighting systems. One bathes the backdrop in uniform light. The other sculpts the subject to match the intended virtual environment. This separation is fundamental.
Soft Lighting and Even Illumination Strategies
Harsh light creates hot spots and deep shadows that destroy keying algorithms. Diffusion is essential. We achieve this with softboxes or by bouncing lights off reflective surfaces.
For the green screen itself, use at least two lights positioned at equal distances. Measure the luminance across the entire surface to ensure consistency within a 10% variance. This even field is your foundation.
Color temperature matching determines final believability. A background plate shot in daylight (5600K) requires your subject lighting to match. A mismatch screams “composite” to the viewer.
Poor illumination cannot be fixed in post; it can only be masked. Invest your time upfront where it matters most.
Advanced Lighting Methods to Avoid Shadows and Hot Spots
We use a three-point system for the subject: a key light, a fill light, and a backlight. The key light should be 2-3 times brighter than the fill to model dimension while controlling shadows.
The backlight is critical. It creates a defining edge around your subject, helping software separate them from the backdrop. This also drastically reduces color spill.
LED panels deliver superior ROI for this work. They offer adjustable color temperature, generate minimal heat, and consume significantly less power than traditional tungsten sources.
| Component | Backdrop Illumination | Subject Illumination |
|---|---|---|
| Primary Goal | Uniform, shadow-free field | Match virtual environment & model subject |
| Minimum Lights | 2 units (e.g., 1000W with softboxes) | 3-point system (Key, Fill, Backlight) |
| Critical Metric | Luminance consistency (<10% variance) | Color temperature and directionality match |
Always ensure your subject lighting mimics the directionality of your target background. This attention to detail sells the final effects and makes the composite seamless. The entire production depends on this disciplined approach.
Camera Settings and Shooting Techniques
Your camera becomes the final gatekeeper between amateur attempts and professional chroma key results. We approach these technical decisions with surgical precision—every setting impacts your editing efficiency.
Capture quality determines keying success from the first frame. Poor choices here create problems that cannot be fully corrected in post-production.
Optimal Resolution, Frame Rate, and Format Choices
We mandate 4K resolution as your baseline. Higher pixel density provides cleaner edges around fine details like hair and transparent objects. Standard definition footage simply lacks the data for professional composites.
Your technical checklist should include:
- 24fps minimum frame rate for natural motion
- MP4 or MOV formats with H.264/ProRes codecs
- 1/100 shutter speed or faster to minimize blur
- 10-bit color depth for superior color gradation

Tripod stability is non-negotiable. Any camera movement introduces parallax issues that complicate the entire keying process. Razor-sharp focus on your subject prevents edge feathering that blends with the background.
Make sure your green screen fills the entire frame with generous safety margins. Test your specific equipment before production—every camera sensor renders color differently. This discipline separates broadcast-quality video from amateur composites.
Mastering the Post-Production Process
Post-production efficiency separates profitable projects from time-consuming experiments in video compositing. We treat the editing phase as the final quality gate where preparation meets execution.
Editing Software Capabilities and Chroma Key Tools
Software selection directly impacts your workflow speed and output quality. Professional suites like Adobe Premiere Pro and DaVinci Resolve offer advanced chroma key engines that handle complex edge refinement.
These tools provide precise control over screen gain and balance adjustments. Understanding these parameters gives you command when automated solutions struggle.
| Software Platform | Keying Tool | Best For | Learning Curve |
|---|---|---|---|
| Adobe Premiere Pro | Ultra Key effect | Broadcast workflows | Moderate |
| Final Cut Pro X | Keyer filter | Mac-based production | Gentle |
| DaVinci Resolve | Delta Keyer | Color-critical projects | Steep |
Refining Edges for a Smooth Composite
Edge refinement separates amateur from professional results. Adjust matte choker and feather parameters to create natural boundaries between subject and background.
Properly lit footage keys cleanly in minutes. Add slight background blur to mimic natural depth of field. This final touch sells the composite’s realism.
Always review your final cut on multiple displays. What looks perfect on a calibrated monitor may show issues on consumer screens.
Creative Uses and Advanced Techniques
We’ve moved past simple background swaps into a world where chroma key technology builds entire realities. Modern productions leverage this power for floors, props, and even full-body suits. This approach seamlessly blends practical performances with digital effects.
The strategic advantage lies in continuity control. You can shoot talent once and swap the background graphics endlessly. This is a lifesaver for localization, branding variations, or seasonal updates without reshooting.
Experimenting with Different Backgrounds and Angles
Camera angles dramatically impact your final composite. A 45-degree shot often provides cleaner edge mattes than a straight-on view. This angle creates dimensional separation that simplifies the keying process.
Having multiple virtual backdrops gives immense freedom during editing. You can experiment with different looks until you find the perfect fit. This method is a powerful way to refine your creative vision.
Integrating Effects and Virtual Sets
Virtual set technology transforms the passive backdrop into an interactive environment. LED walls displaying real-time backgrounds now combine with traditional techniques. Game engines like Unreal Engine allow directors to see the final composite during filming.
Foreground green screen elements add incredible depth. Place panels closer to the camera than your subject. Key them out to insert foreground elements, creating layered compositions impossible with traditional filming.
The world of live applications also benefits. Broadcast television uses real-time keying engines for zero-latency composites during interactive presentations. This advanced use of green screen technology is reshaping live production.
Troubleshooting Common Green Screen Challenges
We approach troubleshooting as a diagnostic discipline, not a reactive scramble when problems emerge in post-production. Our systematic method identifies root causes before they compromise your final composite quality.
Identifying and Fixing Green Spill and Inconsistent Lighting
Color contamination remains the most frequent obstacle in chroma key workflows. Green spill occurs when background color reflects onto your subject’s edges and clothing.
We prevent this by maintaining proper distance between talent and backdrop. Consistent illumination across the entire surface is non-negotiable for clean extraction.
Reflective surfaces multiply challenges exponentially. Glasses, jewelry, and shiny fabrics catch and bounce color, creating correction nightmares during editing.
| Common Issue | Prevention Method | Post-Production Fix |
|---|---|---|
| Green Spill | 6-10 foot subject distance | HSL adjustments for selective correction |
| Inconsistent Lighting | Light meter verification ( | Multiple keying passes with adjusted tolerance |
| Reflective Surfaces | Matte clothing and prop treatment | Manual rotoscoping and color isolation |
Wardrobe selection critically impacts your results. Avoid colors that match or contain hints of your backdrop hue. Even dark greens can create transparency artifacts.
Blue screen alternatives solve specific costume or location conflicts. However, they demand significantly more illumination power than standard setups.
Conclusion
What separates amateur attempts from broadcast-quality results isn’t budget but disciplined technique. We’ve demonstrated that professional video production using chroma key technology follows predictable patterns—master these, and you control the outcome.
The journey from Georges Méliès’ pioneering film work to today’s virtual production proves one constant: environmental control expands creative possibilities. Your investment in proper setup pays immediate dividends, saving countless hours in post-production.
Practice with intention. Each session should target one specific improvement area—lighting consistency, subject positioning, or keying refinement. This systematic approach transforms trial and error into measurable progress.
Implement these methods, test results objectively, and iterate based on data. That’s the professional way to master this craft and produce content that competes in today’s visual world.
FAQ
What is the best color for a chroma key background?
We recommend a specific, vibrant shade of green because digital cameras are most sensitive to it, resulting in a cleaner key. While blue is a traditional alternative, green generally provides superior results with modern equipment and is less likely to match clothing or skin tones.
How can I prevent shadows on my background?
Use soft, diffuse lighting sources positioned to evenly illuminate the entire surface. Place your subject several feet in front of the backdrop and light them separately. This separation is critical for eliminating shadows and hot spots that complicate the editing process.
What is the most common mistake when using a green screen?
The most frequent error is improper lighting. Many assume any light will work, but uneven illumination or color spill from the backdrop onto the subject creates major issues in post-production. Investing time in a proper lighting setup saves hours of frustrating work in software like Final Cut Pro or Adobe Premiere.
Can I use any green fabric for a chroma key?
No. We advise against using random colored cloth. The ideal material is a non-reflective, matte fabric specifically designed for chroma key work. This ensures a consistent color that won’t create shine or blur, which are difficult for editing software to process cleanly.
Do I need expensive software for chroma keying?
Not necessarily. Many consumer and prosumer editing programs have powerful chroma key tools built-in. The quality of your final composite depends more on the quality of your original footage—proper lighting, a smooth background, and a high-resolution camera—than on the cost of your software.
How far should the subject stand from the green screen?
We recommend a minimum of six feet. This distance is crucial for preventing the background color from reflecting onto your subject (known as green spill) and gives you ample space to light the backdrop and the subject independently for a flawless effect.